
Part I | Part II| Part III
When the Academy F-16 build began running into roadblock after roadblock, I started searching about for something else to share the bench. And damn did I ever vacillate. Until I somehow stumbled upon this profile of a Messerschmitt Me 262A-2a:

It seems this particular specimen was left abandoned in a field in Austria after its port maingear collapsed.

I’m not sure if I’m going to try to tackle this sucker as a diorama setup yet, or just build it as is, but either way it’ll definitely be a looker. I’ve even got an idea of how I’m going to tackle all the puttied panel joints, but I’m going to save that until I start painting.
For now, on with getting this sucker off the ground!
Test Fit
Trumpeter’s Me 262 is generally regarded as one of their better kits, and likely the best Me 262 available in any scale. The A-2a boxing is more or less like all the others, only it includes the two fuselage pylons intended to carry bombs.
A quick test-fit revealed just how much DNA the 1/48 Hobby Boss 262s share with their larger Trumpeter cousins, from the cockpit and gun bay tabs to the assembly of the engine pods to the wings.

Everything fits together quite well, with the only trouble spot being the forward gun cover. But I don’t foresee it being a major obstacle once construction gets underway.
I should also add at this point that the stabilizers are brilliant – literally press-fit – and quite possibly the best engineering of such I’ve encountered on any kit I’ve built to date.

Full Jumo engines are included – why is beyond me. They will be completely invisible once the pods are together, unless you use the gimmicky clear engine pods, which I will not.

The Cockpit
Shocker! An aircraft build starting in the office! There’s a rather pricey Aires aftermarket affair, but I decided to stick with the kit plastic and a few accents from the Eduard PE set.
First step – painting the parts. I primed them with Mr. Surfacer 1500 Black, then sprayed some Tamiya German Gray lightened with a few drops of Neutral Gray.

At this point, I was torn as far as what to do with the instrument panel. The Eduard gauge faces are nice, but their RLM 66 is very purplish. That may work in 1/48, but not in 1/32, so I gave the kit IP a shot tackling the gauge surrounds with black acrylic ink and Vallejo Offwhite, Red and Deep Yellow.

Ultimately, I much prefer the kit part to the Eduard IP face.

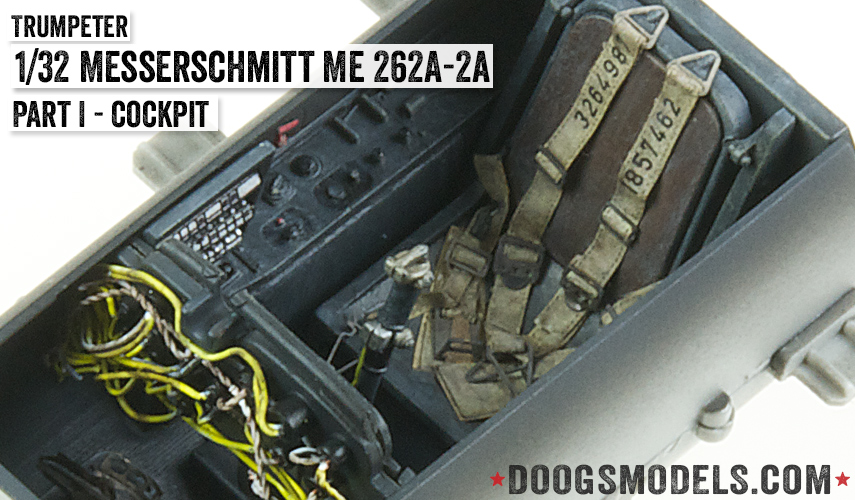
Elsewhere, I set about the detailing. The leather seatback was painted Vallejo Leather Brown, then the contour accentuated the Vallejo Game Color Wash in Umber and Black. I drybrushed everything with my good old Model Master Dunkelgrau, but my bottle had clearly gone bad or something, nearly ruining the seatback. Ultimately, I switched over to Model Master Armor Sand to finish out.

Next, I wired up the back of the instrument panel with Ultrawire and lead wire.

Why? Because it’s highly visible through the front windscreen.

After the wiring, I moved on to the seatbelts. I had a set of HGW’s laser-cut Luftwaffe belts lying around, so used those.

Typically I’d use oils to weather the belts, but I had some additional weathering I wanted to do to simulate a jet left out in the elements for some time, so I decided to try Vallejo’s Game Color Wash in a mixture of umber and black.

This is my new favorite stuff. It did an exceptional job on the seatbelts with me doing nothing more than brushing it on. And it dried quick so I could keep working.

To finish out the cockpit, I applied some AK Interactive Dust Effects to lighten and generally dirty things up.
And with that, the cockpit is done (save for the gunsight, which will be added much later).


And that wraps up Part I. Stay tuned for Part II, which will involve getting the gear bays and engine intakes and exhausts sorted out.
And…that’s all for now. Stay tuned for Part II, which will probably involve finishing out the cockpit, tackling the gear bay, and getting the intake sorted and painted.

Superb work as always. Would you consider doing a video guide to setting up an airbrush kit? i seem to have inordinate amounts of difficulty with mine, half an hour of messing about for 5 mins spraying!
Great work on that instrument panel, not very often I’ve seen Eduard’s bettered!
Nice work Doogs. Cockpit looks great and good on you for ditching the Eduard IP – you’ve achieved a better result. Will be using the Game Colour wash in the future after seeing your results.
While you are not quite there yet, watch out for the join between the bottom forward fuselage and the front section of the wing. If you leave it as, you will get a large step to fill. To avoid, pack the lower centre wing section with some plastic to bring the wing and fuselage joint level to each other.
Other than that, the Trumpeter 262 is pretty easy to build and looks awesome once done.
Keen to see you how do the puttied panel lines. I’ve got another 262 lined up, this one in camo, but I want the puttied lines showing through the thin camo coat.
Beautiful, but where do I find Ultrawire?
Thanks
It’s popular in fly fishing. Can’t remember the exact store I buy from…something like J.Stockards. Just do a search for Ultrawire and look for the small and extra-small sizes.
Also a big fan of the same company’s Uni-Mono monofilament for rigging purposes.
Thanks Doog!